
Rev is still at the Gunsmith's, lying disassembled and waiting for a part. Turns out there was some kind of problem with the feed ramp (the mechanism that moves the bullet from the magazine and lifts it to meet the bolt before it can be chambered for firing), and good news, parts can still be ordered for it. The bad news? The part was supposed to be here Friday, and it wasn't, and now the gunsmith is on a two-week vacation with his relatives up north. Mutter grumble. It's a good thing there was no apocalypse this weekend, or I'd have been really put out.
Izzy still works as a rifle, but the sights are nonfunctional at the moment. With the Weaver rail shot to hell (more on that in a moment) I tried to install the old leaf sight as an interim measure, but found I didn't have the strength to depress the spring (which keeps the sight in place through pressure) with my fingers. I could probably fix it with some C-clamps, but 1) I don't own any and 2) I don't really want to buy them just for this.
So anyway. Weaver rails. For those who don't know what they are, this is what they look like:
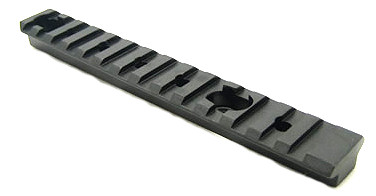
These are handy pieces of equipment to have, because they make adding accessories like scope, lasers, flashlights etc to your weapon about as easy as putting two pieces of Lego together. (My private slang for this sort of thing is lego-tech.) Most accessories come with weaver-compatible mounts; just put them on the rail, screw it down, and you're done.
This is quite a big deal, because prior to the invention of these tactical rails, the only way to get a scope mounted was to take your gun to your armorer/gunsmith, who would sigh heavily at your request. Mounting a scope in the old days (prior to 1975) meant the gunsmith had to:
- Disassemble the gun
- Mount it in a vise
- Painstakingly measure the mounting holes to ensure that they would be aligned with the barrel
- Drill and tap holes through hardened steel
- Install the scope rings
- True the rings to each other
- Lap the rings if necessary
- Install the scope
- Zero the scope
- Reassemble the gun and make sure everything works.
The Weaver rail changed all that. Modern guns either come with tactical rails already mounted -- some screwed into place, some as integral parts of the upper receiver -- and the rest come with grooves or holes already drilled & tapped for their installation. Overall, they're wonderful things, giving flexibility to your weapon of choice and allowing non-gunsmiths to make alterations as needed. If you need to go from precision shooting to close-combat, it's easy to remove the rifle scope and replace it with a reflex sight. Takes all of five minutes to accomplish and only requires simple tools, like a wrench.
"Easy, rugged, cheap; pick any two" is a good analysis of a lot of weapon accessories. Weaver picked "easy and cheap" and had the rails milled out of blocks of 6061 aluminum. Now that by itself isn't so bad; aluminum is light and relatively strong. A lot of airplane parts, like wings and fuselage, are made out of this particular alloy, hence why it's often known as Aircraft Aluminum. The problem is that aluminum is softer than steel.
Not a big deal, right? Answer me this: what are screws made of?
99% of the time, it's steel of some variety. And it's very, very easy to strip the internal aluminum threads with a steel screw if you over-tighten. Heck, even if you don't over-tighten it's still possible.
So when I mounted my aluminum Weaver rail to the rear sight of my Mosin-Nagant and tightly screwed it into place because I didn't want it coming loose... well, you can guess what happened.
I am reasonably sure that I didn't over-tighten the screws, but I have no way of being certain of that. What I do know is that the scope mount stayed night and tight when I was shooting 174gr rounds, but went loose and flopped around from the 180gr recoil. So either the increased recoil vibrated the steel screws, causing the aluminum threads to shear off, or they were already weakened and partially stripped from over-tightening and the recoil just finished it off. Either way, it's ultimately my fault, because I bought the gear and installed it.
I have managed to scrape together enough money to buy a replacement scope mount. This one comes with high marks and apparently has lots of steel-on-steel fasteners. I will give it a thorough review once it comes in.

Picking up a rifle isn't even in my long-term plans (but a Kimber Custom is in the medium-range plans), but I know how much I loved when I started getting M4s with the Picatinny Rail system during my Army days. Of course, it also has the side-effect of geardos putting way more crap on it than they need. BIG fan of rails.
ReplyDelete"Geardo," LOL. Love it. I'm probably guilty of that myself. I just chalk it up to the female urge to have accessories for EVERYTHING. ;)
ReplyDeleteDespite or perhaps because of how little I know about guns (the pointy end goes bang) I really enjoy these posts.
ReplyDeleteThey're technical without straying into Matthew Reilly over-specificity and the historical aspect is fun.
Plus any information that might one day help in the zombie apocalypse is a bonus. Even though if I don't know how to shoot by the time they're at the door it'll probably be too late for me.